Инструкция для Leadtek WinFast GT 520
 1
1 2
2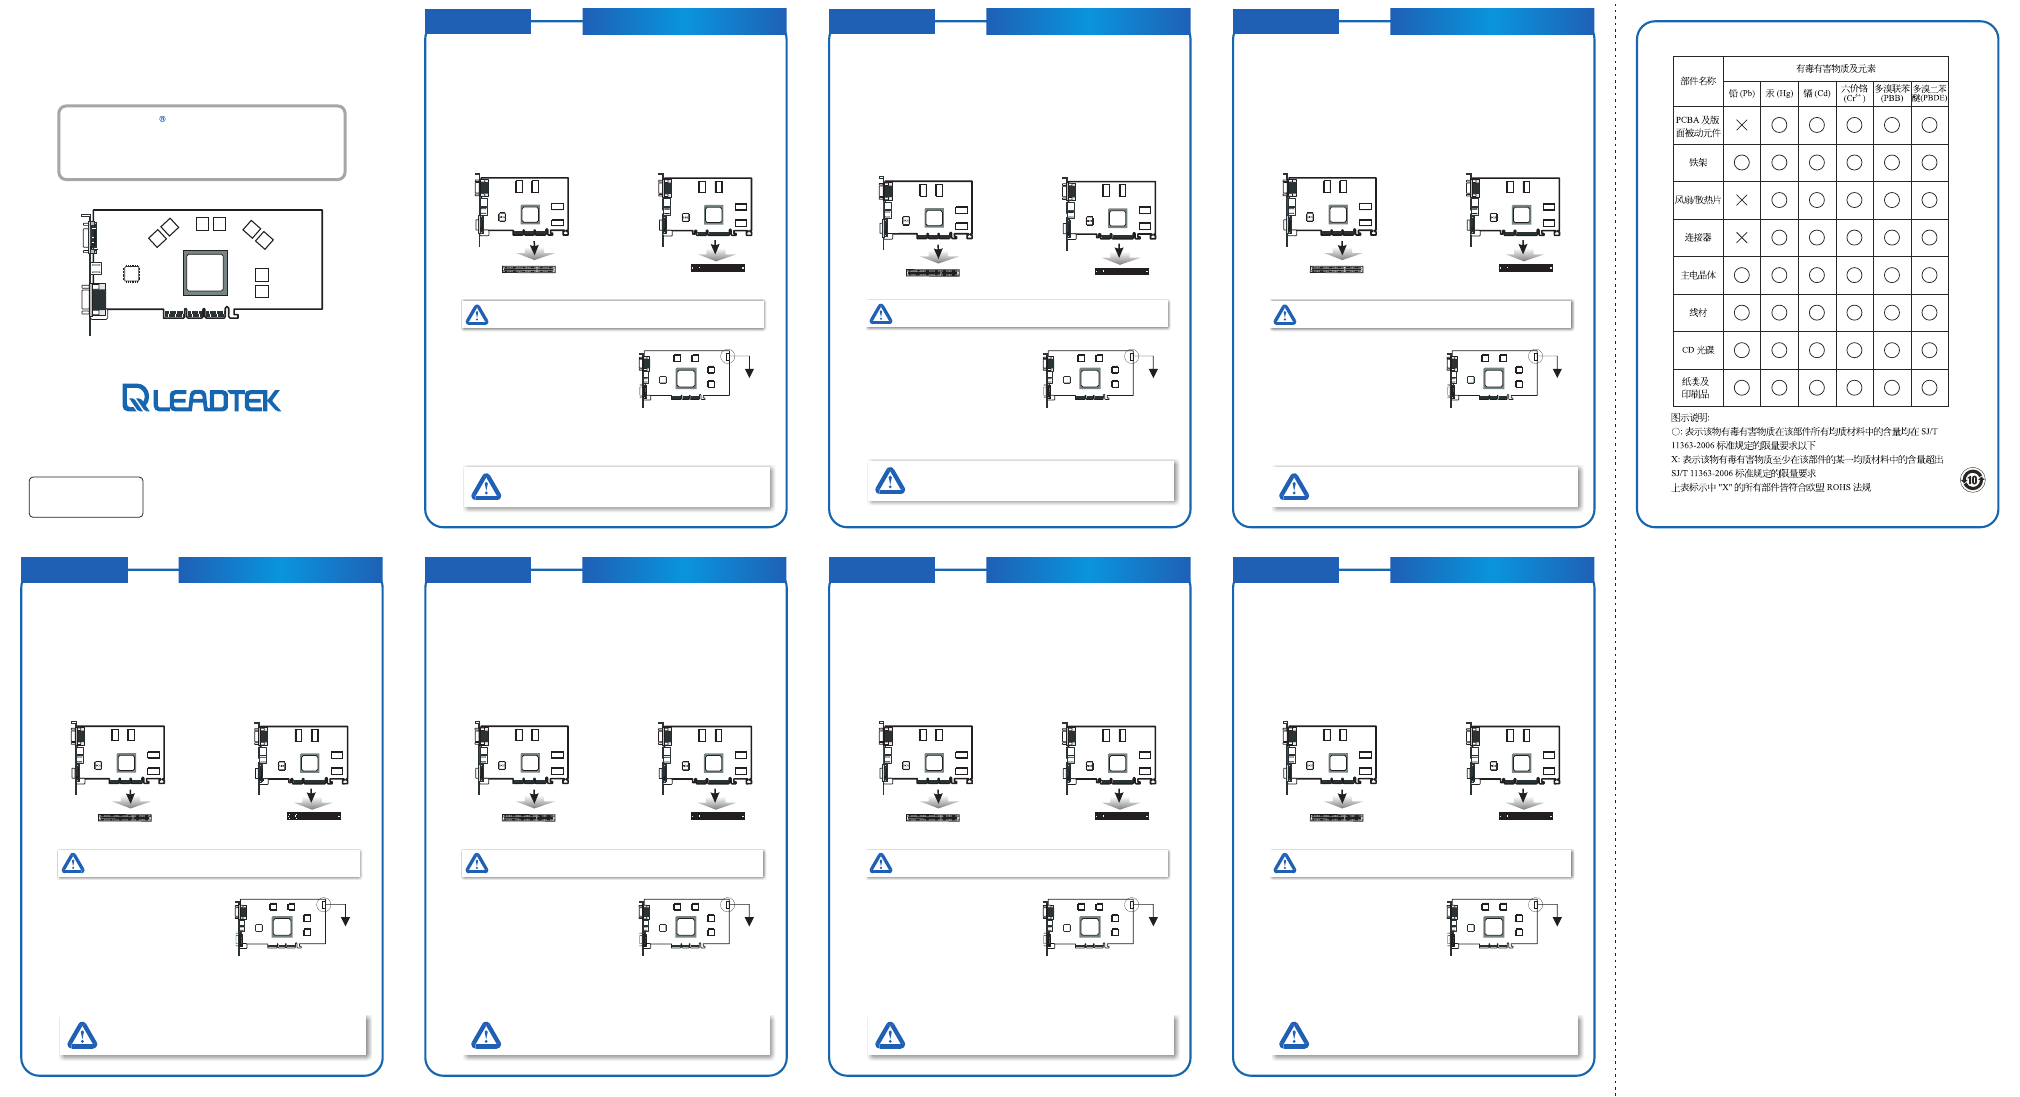
Step
4
If the card has a 6-pin or 8-pin power
connector located at the edge of the
board, please connect the PCI-E power
cable from the system power supply to
the 6-pin or 8-pin power connector.
Step
5
Fasten the mounting bracket to the chassis and put the cover back. Plug the cord
into the matched connector of the graphics card according to what kind of monitor
you have.
English
Locate the AGP or PCI Express bus expansion slot on your system motherboard
and remove the cover if there is one.
OR
If there is an existing VGA card, remove the old card by loosening the mounting
bracket and pulling the card off the slot.
Step
2
Shut down the computer; unplug all the cables and electrical cords; and remove the
cover from the computer chassis.
Step
1
HARDWARE INSTALLATION
Step
3
Position the new card over the AGP or PCI Express slot. Insert the bus connector
in the slot and gently press the bus connector down.
Inserting your card into the wrong type of slot can damage your
card, your computer, or both.
AGP slot
PCI Express slot
OR
For those high-end boards with 2 power connectors, please
connect each with a dedicated PCI-E power cable directly from
the ATX power supply.
Code: LR2xxx
P/N: W0501G00441
Ver. C
6-pin or 8-pin
power connector
WinFast
BIOS
WinFast
Graphics to Drench Your Senses
WinFast Graphics Series
QUICK INSTALLATION GUIDE
步驟
4
如果顯示卡的邊緣有一個六孔
或八孔
的電源連接頭,請將電源供應器的六
接腳
或八接腳
的
PCI
-
E
電源線接到此
連接頭上。
步驟
5
將電腦機箱蓋重新裝回去
然後將顯示器連接頭插在顯示卡連接埠
並鎖
緊
再將所有其他連接線和電線接回去
,
,
。
。
繁體中文
找出在您電腦主機板上的
AGP
或
PCI Express
插槽
將此蓋子拿掉
或
如果您的主機板上原本就插有顯示卡
請先將舊卡移除;移除時先將固定金
屬片的螺絲鬆落
再將卡由插槽中拔出
,如果插槽上有保護蓋,
。
,
,
。
步驟
2
將電腦關機
並拔除所有連接線及電源線
拆下電腦機箱蓋
,
,接著
。
步驟
1
硬 體 安 裝
步驟
3
將新卡的匯流排對準
AGP
或
PCI Express
插槽插入,並小心地往下壓到底。
警告
:
將新顯示卡插入錯誤的插槽中
可能會損害此卡
甚至連電
腦本身都會受到傷害
,
,
。
AGP
插槽
PCI Express
插槽
或
某些高階顯示卡上有兩個電源連接頭,請各接上一條直接來自電
源供應器的獨立
PCI
-
E
電源線。
6-pin
或
8-pin
電源接頭
WinFast
This manual is made from
100% recycled paper
本手冊由
再生紙製成
100%
Schritt
4
Wenn sich am Rand der Karte ein 6- oder
8-poliger Stromanschluss befindet,
schließen Sie das vom Systemnetzteil
kommende PCI-E-Stromkabel an den 6-
oder 8-poligen Stromanschluss an.
Schritt
5
Befestigen Sie die Montageklemmen am Chassis und setzen das Gehäuse wieder
auf. Stecken Sie das Monitorkabel an den je nach Art des Monitors dazugehörigen
Anschluss an der Grafikkarte. Schließen Sie alle anderen Kabel wieder an.
Deutsch
Das Motherboard verfügt über einen AGP- oder PCI Express-
Erweiterungssteckplatz. Entfernen Sie die Abdeckung davon.
ODER
Entfernen Sie die vorhandene Grafikkarte, indem Sie die Haltebügel lösen und die
Karte aus dem Steckplatz ziehen.
Schritt
2
Schalten Sie den Computer aus. Trennen Sie alle verbundenen Kabel ab und
entfernen Sie das Gehäuse vom Computer.
Schritt
1
HARDWARE INSTALLATION
Schritt
3
Richten Sie die neue Karte über dem AGP- oder PCI-Express-Steckplatz aus.
Schieben Sie den Bus-Stecker auf den Steckplatz und drücken ihn vorsichtig hinein.
Wenn sie die karte in einen falschen steckplatz einsetzen, kann die
karte, der computer oder beides beschädigt werden.
AGP-Steckplatz
PCI Express
ODER
Bei High-End-Karten mit 2-Stromanschlüssen muss jeder
dieser Anschlüsse mit einem entsprechenden PCI-E-
Stromkabel mit dem ATX-Netzteil verbunden werden.
6- oder 8-poliger
Stromanschluss
WinFast
Etape
4
Si la carte a un connecteur d'alimentation 6
broches ou 8 broches situé sur le bord de la
carte, veuillez connecter le câble
d'alimentation PCI-E de l'alimentation du
système au connecteur d'alimentation 6
broches ou 8 broches.
Etape
5
Serrez les supports de montage sur le châssis et remettez le capot. Branchez le
cordon au connecteur correspondant de la carte graphique en fonction de votre type
de moniteur. Reconnectez tous les câbles et cordons.
Français
Localisez le logement d'extension du bus AGP ou PCI Express sur la carte mère de
votre système et retirez le cache, s'il y en a un.
OU
S'il y a une carte VGA, retirez l'ancienne carte en desserrant les crochets de
montage et en extrayant la carte du slot.
Etape
2
Eteignez l'ordinateur; débranchez tous les câbles et cordons électriques; et retirez
le couvercle du châssis de l'ordinateur.
Etape
1
INSTALLATION MATERIELLE
Etape
3
Placez la nouvelle carte au-dessus du logement AGP ou PCI Express. Insérez le
connecteur de bus dans le logement et enfoncez doucement le connecteur de bus.
Si vous inserez votre carte dans le mauvais type de logement vous
risquez d'Endommager votre carte, votre ordinateur, ou les deux.
Logement AGP
PCI Express
OU
Pour ces cartes haut de gamme avec 2 connecteurs d'alimentation,
veuillez connecter chaque connecteur à l'aide du câble d'alimentation
PCI-E dédié directement à partir de l'alimentation de l'ATX.
Connecteur
d'alimentation 6
broches ou 8
broches
WinFast
Paso
4
Si la tarjeta tiene un conector de corriente
de 6 u 8 contactos situado en el borde de la
placa, conecte el cable de corriente PCI-E
de la fuente de alimentación del sistema al
conector de corriente de 6 u 8 contactos.
Paso
5
Apriete el soporte de montaje al chasis y vuelva a colocar la carcasa. Enchufe el
cable en el conector que coincide en la tarjeta gráfica según el tipo de monitor que
tenga. Vuelva a conectar todos los cables y cordones.
Español
Localice la ranura de expansión del bus AGP o PCI Express en la placa base de su
sistema y quite la tapa si hay una.
O
Si ya hay una tarjeta VGA, quite la antigua tarjeta soltando las grapas de montaje y
tirando de la tarjeta hacia fuera.
Paso
2
Apague el ordenador; desenchufe todos los cables y cordones eléctricos y quite la
carcasa del chasis del ordenador.
Paso
1
INSTALACIÓN DEL HARDWARE
Paso
3
Coloque la nueva tarjeta en la ranura AGP o PCI. Inserte el conector de bus en la
ranura y presione suavemente el conector del bus hacia abajo.
Si inserta la tarjeta en una ranura equivocada, puede dañar la
tarjeta, ordenador o ambos.
Ranura AGP
PCI Express
O
Para las placas de alta prestación con 2 conectores de
corriente, conecte cada uno a un cable de corriente PCI-E
dedicado directamente desde la fuente de alimentación ATX.
Conector de
corriente de 6 u 8
contactos
WinFast
Passaggio
4
Se la scheda presenta un connettore di
alimentazione da 6 pin o 8 pin situato al
bordo della scheda stessa, collegare il cavo
di alimentazione PCI-E dall'alimentatore
del sistema al connettore di alimentazione
da 6 pin o 8 pin.
Passaggio
5
Serrare la staffa di montaggio al telaio e reinserire il coperchio. Collegare il
cavo del connettore adatto della scheda grafica a seconda del tipo di monitor
utilizzato.
Italiano
Individuare uno slot di espansione del bus AGP o PCI Express sulla motherboard
e rimuoverne il coperchio, se presente.
OPPURE
Se è presente una scheda VGA, rimuovere la vecchia scheda allentando la staffa
di montaggio ed estraendo la scheda dallo slot.
Passaggio
2
Spegnere il computer; scollegare tutti i cavi, compreso quelli di alimentazione, e
rimuovere il coperchio del telaio del computer.
Passaggio
1
INSTALLAZIONE DELL'HARDWARE
Passaggio
3
Posizionare la nuova scheda sopra lo slot AGP o PCI Express. Inserire il
connettore del bus nello slot e premere con delicatezza nel connettore del bus.
L'inserimento della scheda in uno slot del tipo errato può
danneggiare la scheda, il computer o entrambi.
Slot AGP
Slot PCI Express
OPPURE
Per le schede di fascia alta dotate di 2 connettori di
alimentazione, utilizzare un cavo di alimentazione PCI-E per
collegare ognuno di essi a direttamente dall'alimentatore ATX.
Connettore di
alimentazione a
6 pin o 8 pin
WinFast
ステ ッ プ
4
カードの端に
6
ピンまたは
8
ピンの電
源コネクタがある場合、システム電
源からの
PCI-E
電源ケーブルを
6
ピン
または
8
ピンコネクタに接続してくだ
さい。
ステ ッ プ
5
取り付けブラケットをシャシーに固定し、カバーを元に戻してくださ
い。お使いのモニタに合わせて、コードをグラフィックカードの適切
なコネクタに接続してください。すべてのケーブルとコードを再接続
してください。
日本語
システムマザーボードの
AGP
または
PCI
エクスプレスバス拡張スロットを
見つけ、カバーが付いている場合はカバーを取り外してください。
または
既存の
VGA
カードがある場合は、ネジを緩め、カードをスロットから取り
外してください。
ステップ
2
コンピュータの電源を切り、すべてのケーブルや電気コードを取り外し
て、コンピュータカバーを取り外してください。
ステップ
1
ハードウェアのインストール
ステップ
3
AGP
または
PCI
エクスプレススロットに新しいカードを設置します。バス
コネクタをスロットに挿入し、下方向へそっと押してください。
カードを間違ったスロットに挿入すると、カードや
コンピュータの故障の原因となります。
AGP
スロット
PCI
エクスプレス
または
2
つの電源コネクタを備えた高性能ボードには、
ATX
電源か
らの専用の
PCI
-
E
電源ケーブルをそれぞれに直接接続して
ください。
6
ピンまたは
8ピン電源コネ
クタ
WinFast
*
*
*
