Инструкция для Sanus New VisionMount VML10
 1
1 2
2 3
3 4
4 5
5 6
6 7
7 8
8 9
9 10
10 11
11 12
12 13
13 14
14 15
15 16
16 17
17 18
18 19
19 20
20 21
21 22
22 23
23 24
24 25
25 26
26 27
27 28
28 29
29 30
30 31
31 32
32 33
33 34
34 35
35 36
36 37
37 38
38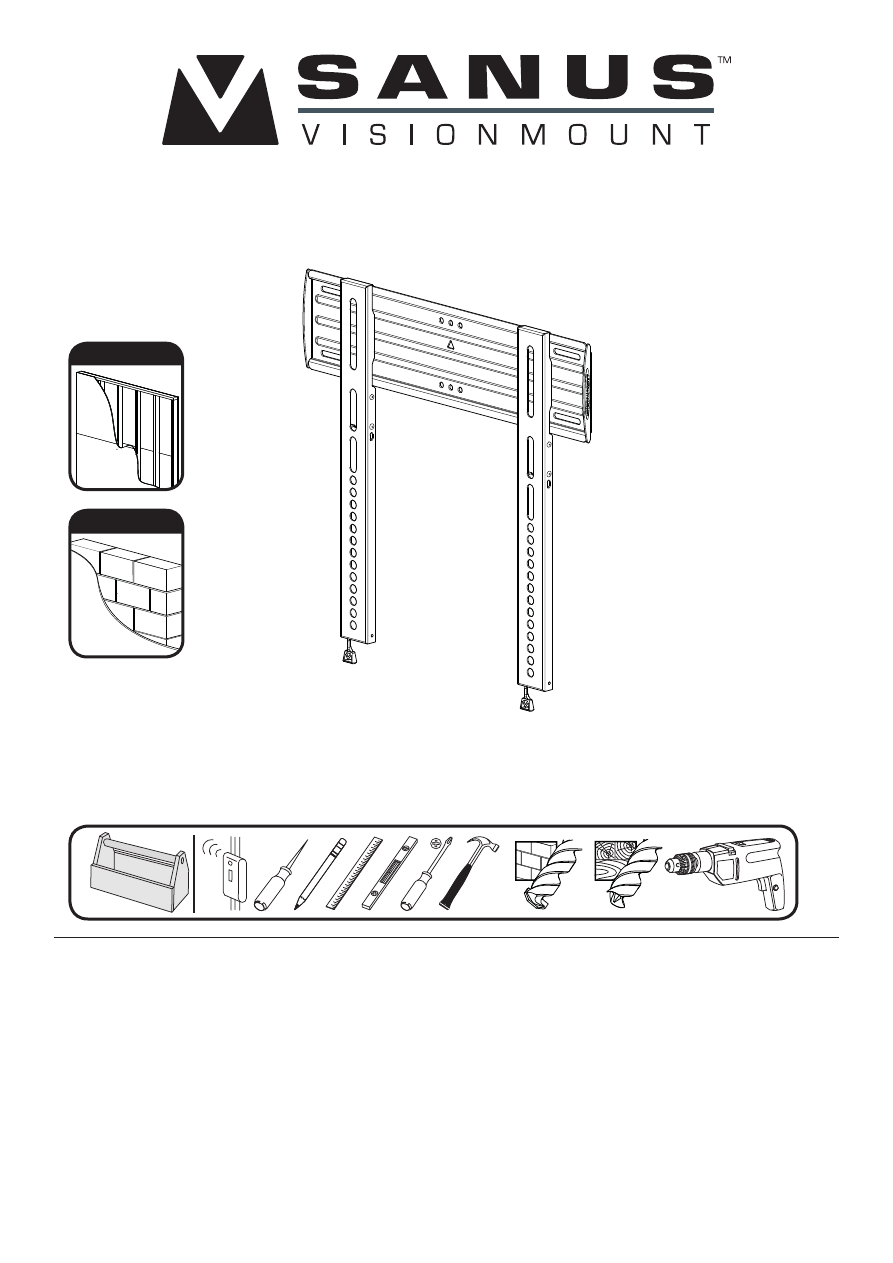
Sanus Systems
2221 Hwy 36 West
Saint Paul, MN 55113 USA
Customer Service
Americas: 800-359-5520 • 651-484-7988 • info@sanus.com
Europe, Middle East, and Africa: + 31 40 2324700 • europe.sanus@milestone.com
Asia Pacifi c: 86 755 8996 9226 • sanus.ap@milestone.com
sanus.com
©2009 Milestone AV Technologies, a Duchossois Group Company.
All rights reserved. Sanus is a division of Milestone.
All other brand names or marks are used for identifi cation purposes and are trademarks of their respective owners.
VML10
(6901-002029 <02>)
Wood Stud
Concrete
10mm
(3/8 in.)
5mm
(3/16 in.)
Оглавление инструкции
- Страница 1 из 39
VML10 (6901-002029 <02>) Wood Stud Concrete 10mm (3/8 in.) Sanus Systems 2221 Hwy 36 West Saint Paul, MN 55113 USA Customer Service Americas: 800-359-5520 • 651-484-7988 • info@sanus.com Europe, Middle East, and Africa: + 31 40 2324700 • europe.sanus@milestone.com Asia Pacific: 86 755 8996 9226 •
- Страница 2 из 39
A English Norsk IMPORTANT SAFETY INSTRUCTIONS – SAVE THESE INSTRUCTIONS – PLEASE READ ENTIRE MANUAL BEFORE USING THIS PRODUCT Specifications VIKTIGE SIKKERHETSINSTRUKSJONER – TA VARE PÅ DISSE INSTRUKSJONENE – LES HELE HÅNDBOKEN FØR DU BRUKER DETTE PRODUKTET Spesifikasjoner Weight capacity: 36 kg
- Страница 3 из 39
B ? English Concrete/Concrete Block Walls Choose an Option Do Not Murs en béton coulé ou en blocs de béton Sélectionnez une option Interdit Beton-/Betonsteinwände Wählen Sie eine Option Tun Sie Folgendes nicht Paredes de hormigón o de bloques de hormigón Elija una opción Prohibido Paredes de
- Страница 4 из 39
English WARNING: This product contains small items that could be a choking hazard. Caution / Warning Repeat Step Heavy! Assistance Required. Ce produit contient de petites pièces qui peuvent représenter un risque d’étouffement. ATTENTION/ AVERTISSEMENT! Répétez l’étape TRÈS LOURD ! Cette étape
- Страница 5 из 39
C CAUTION: English Português CAUTION: Avoid potential personal injuries and property damage! ATENÇÃO: Evite possíveis ferimentos pessoais e danos à propriedade! ! Do not use this product for any purpose not explicitly specified by Sanus Systems. Não use este produto para uma finalidade
- Страница 6 из 39
CAUTION: Ελληνικά Русский ΠΡΟΣΟΧΗ: Αποφύγετε την πιθανή πρόκληση τραυματισμού ή υλικής βλάβης! ОСТОРОЖНО! Соблюдайте правила безопасности, чтобы предотвратить возможные травмы и повреждение имущества! Μη χρησιμοποιείτε αυτό το προϊόν για οποιονδήποτε σκοπό που δεν ορίζεται ρητά από τη Sanus
- Страница 7 из 39
CAUTION: 日本語 注:ケガや壁面の破損が起こらないように注意してください。 Sanus Systemsが明確に指定している以外の目的で本製品を使用し ないでください。 取り付け先の壁は、モニターとマウントの総重量の5倍を支えら れなければなりません。 本製品は金属スタッドの壁での使用には適していません。 ここに記載される説明を理解できない場合、または製品の取り付 け、組み立て、使用について質問がある場合、Sanus Systemsカ スタマーサービスまたは認定業者にお問い合わせください。 Sanus Systemsは、不適切な組み立てや使用によって起きた破損ま
- Страница 8 из 39
D English Norsk Supplied Parts and Hardware Before starting assembly, verify all parts are included and undamaged. If any parts are missing or damaged, do not return the damaged item to your dealer; contact Sanus Systems Customer Service. Never use damaged parts! NOTE: Not all hardware included
- Страница 9 из 39
[01] x 1 [02] x 2 [04] x 4 [03] x 1 [05] x 4 M4 x 30mm M4 x 12mm M4 x 40mm [07] x 4 [06] x 4 [08] x 4 M5 x 30mm M5 x 12mm [09] x 4 M5 x 40mm [11] x 4 [10] x 4 M6 x 14mm M6 x 40mm [12] x 4 [13] x 4 M4 / M5 [14] x 4 M8 x 45mm M8 x 16mm [16] x 4 [17] x 4 14mm [18] x 4 M6 / M8 [15] x 4 [19] x 4
- Страница 10 из 39
1 ? CAUTION: English Español Install Brackets Instale los soportes 1. Determine the bolt diameter for your TV and your TV type. 1. For TVs with a flat/unobstructed back, see 1-1. Antes de instalar los soportes, determine el diámetro de los pernos según el tipo de televisor que tiene: For TVs
- Страница 11 из 39
Italiano Dansk Installare i bracci Montering af beslag 1. Prima di installare i bracci, determinare il diametro corretto per il televisore e per il tipo di televisore: 1. Find diameteren på skruebolten på dit TV, og undersøg TV-typen: Se trin 1-1 for TV-apparater med flad/uhindret bagside. Per
- Страница 12 из 39
polski 日本語 Montaż wsporników ブラケットの取り付け 1. Przed rozpoczęciem montażu wsporników, określić średnicę śruby telewizora i typ telewizora: 1. ブラケットを取り付ける前に、テレビの種類に応じたボルト径を 判断します。 Dla telewizorów z płaskim tyłem/bez przeszkód, patrz punkt 1-1. Dla telewizorów z nieregularnym tyłem/z przeszkodami,
- Страница 13 из 39
1-1 [02] [02] 4x M4 M5 [02] [02] [14] [14] [06] M6 M8 [02] [02] [15] 6901-002029 <02> [09] [12] [15] [16] 13
- Страница 14 из 39
1-2 [02] [02] 4x M4 M5 [19] [19] [18] [14] [18] [07] M6 [10] M8 [20] [20] [18] 14 [14] [15] [18] [13] [15] [17] 6901-002029 <02>
- Страница 15 из 39
1-3 [02] [02] 4x M5 M4 [20] [20] [18] 6901-002029 <02> [18] [14] [08] [14] [11] 15
- Страница 16 из 39
2 English Adjust Cord Length Dansk For ease of access, cords should be level with bottom of TV. For at lette adgangen bør kabler flugte med den nederste del af tv. Français Svenska Réglez la longueur du câble Justera sladdlängd Pour faciliter l’accès, les câbles doivent être au même niveau que le
- Страница 17 из 39
2x 6901-002029 <02> 17
- Страница 18 из 39
3 ? 10 mm (3/8 in.) 5 mm (3/16 in.) CAUTION: English Português Wall Mounting For assistance in determining wall plate location, see Height Finder at sanus.com. CAUTION: Avoid potential injuries or property damage! Montagem na parede Para obter assistência na determinação da localização da placa de
- Страница 19 из 39
Norsk Česky Veggmontering For hjelp til å avgjøre veggen plate sted, se Høyde Finder på sanus.com. Montáž na zeï Pro pomoc při stanovení zdi deskou místa viz Výška Finder v sanus.com. FORSIKTIG Unngå potensiell skade på person eller materiell! POZOR: Zabraňte možným úrazům a hmotným škodám! Ikke
- Страница 20 из 39
3-1 5 mm (3/16 in.) English Nederlands 1. Locate a single stud. Verify the center of the stud with an awl or thin nail or use an edge to edge stud finder. 1. 2. Level the wall plate [01] and mark the hole locations. Zoek een afzonderlijke drager. Controleer het midden van de drager met een priem of
- Страница 21 из 39
Svenska 中文 1. Leta upp en enkelregel. Markera regelns mitt med en pryl eller en smal spik, eller använd en regelsökare (kant till kant). 1. 确定单墙柱的位置。 使用尖钻或细钉或者使用边到边墙柱查找器确 定墙柱的中心。 2. Se till att väggplattan [01] är rak och markera hålplatserna. 2. 将壁板 [01] 放置水平,然后标注孔位。 3. Borra styrhål enligt
- Страница 22 из 39
1 2 [01] 3 4 63.5 mm (2.5 in.) < 16 mm (5/8 in.) [04] [03] [01] 63.5mm 2.5 in. 22 6901-002029 <02>
- Страница 23 из 39
6901-002029 <02> 23
- Страница 24 из 39
3-2 5 mm (3/16 in.) English Nederlands 1. Locate studs. Verify the center of the stud with an awl or thin nail or use an edge to edge stud finder. 1. Zoek de dragers. Controleer het midden van de drager met een priem of een dunne spijker, of gebruik een balkzoeker van rand tot rand. 2. Level the
- Страница 25 из 39
Svenska 中文 1. Leta upp reglarna. Markera regelns mitt med en pryl eller en smal spik, eller använd en regelsökare (kant till kant). 1. 确定墙柱位置。 使用尖钻或细钉或者使用边到边墙柱查找器确定墙 柱的中心。 2. Se till att väggplattan [01] är rak och markera hålplatserna. 2. 将壁板 [01] 放置水平,然后标注孔位。 3. Borra styrhål enligt bilden. 3.
- Страница 26 из 39
1 41cm (16 in.) 2 [01] 3 < 16 mm (5/8 in.) 63.5 mm (2.5 in.) 4 [01] [04] 63.5mm 2.5 in. 26 [03] 6901-002029 <02>
- Страница 27 из 39
6901-002029 <02> 27
- Страница 28 из 39
3-3 10 mm (3/8 in.) English Italiano 1. Level wall plate [01] and mark the hole locations. 1. 2. Drill pilot holes as illustrated. Mettere a livello la piastra a muro [01] e contrassegnare le posizioni dei fori. 3. Insert lag bolt anchors [05]. Then insert lag bolts [04] using a drill and the Allen
- Страница 29 из 39
polski 1. Wyrównać płytę ścienną [01] i zaznaczyć położenie otworów. 2. Wywiercić otwory prowadzące. 3. Włożyć śruby kotwiczące [05]. Włożyć śruby do drewna [04] za pomocą wiertarki i końcówki imbusowej [03]. UWAGA: Sprawdzić, czy kotwy [05] są równe z powierzchnią ściany betonowej. Česky 1.
- Страница 30 из 39
1 [01] 2 < 16 mm (5/8 in.) 63.5 mm (2.5 in.) [05] 3 [05] [03] [04] 30 [01] 6901-002029 <02>
- Страница 31 из 39
6901-002029 <02> 31
- Страница 32 из 39
4 English Dansk Hang the TV onto the Wall Plate Hæng tv’et på vægpladen Français Svenska Suspendez le téléviseur sur la plaque murale Häng TV:n på väggplattan Deutsch Русский Aufhängen des Fernsehgeräts an der Wandplatte Крепление телевизора к настенной пластине Español polski Cuelgue el televisor
- Страница 33 из 39
[02] [01] 6901-002029 <02> 33
- Страница 34 из 39
5 English Nederlands Cable management Kabelbeheer 1. Pull down on cord to release ClickStands. 1. Trek het snoer omlaag om de ClickStands op te tillen. 2. Gently pull TV away from wall. ClickStands will fall into place. 2. Trek de tv voorzichtig weg van de wand. De ClickStands vallen op hun plaats.
- Страница 35 из 39
Svenska 日本語 Kabelhantering ケーブル管理 1. Dra snöret nedåt för att frigöra ClickStands. 1. コードを下に向けて引き、ClickStandsを持ち上げます。 2. Dra försiktigt ut tv:n från väggen. ClickStands klickar på plats. 2. 3. Sätt i alla sladdar. 壁からテレビをそっと手前に引っ張ります。ClickStandsが所定 の場所に収まります。 4. Dra snöret nedåt för att lyfta
- Страница 36 из 39
2 1 3 36 6901-002029 <02>
- Страница 37 из 39
4 6901-002029 <02> 5 37
- Страница 38 из 39
English Norsk Milestone AV Technologies and its affiliated corporations and subsidiaries (collectively, “Milestone”), intend to make this manual accurate and complete. However, Milestone makes no claim that the information contained herein covers all details, conditions, or variations. Nor does it
- Страница 39 из 39
